
Overview

The Explore module is designed to help your users discover content through curated questions โ€” think of it as a personalized tour guide for your content library. Unlike the Ask module (which answers specific questions), Explore surfaces related questions based on the article a user is currently reading.
1

Obtain Your API Key

Log in to the Miso Dashboard, select your target environment (e.g., Production), and navigate to the Overview section to copy your Publishable API Key.Miso Dashboard โ€” select your environment and copy your API keys
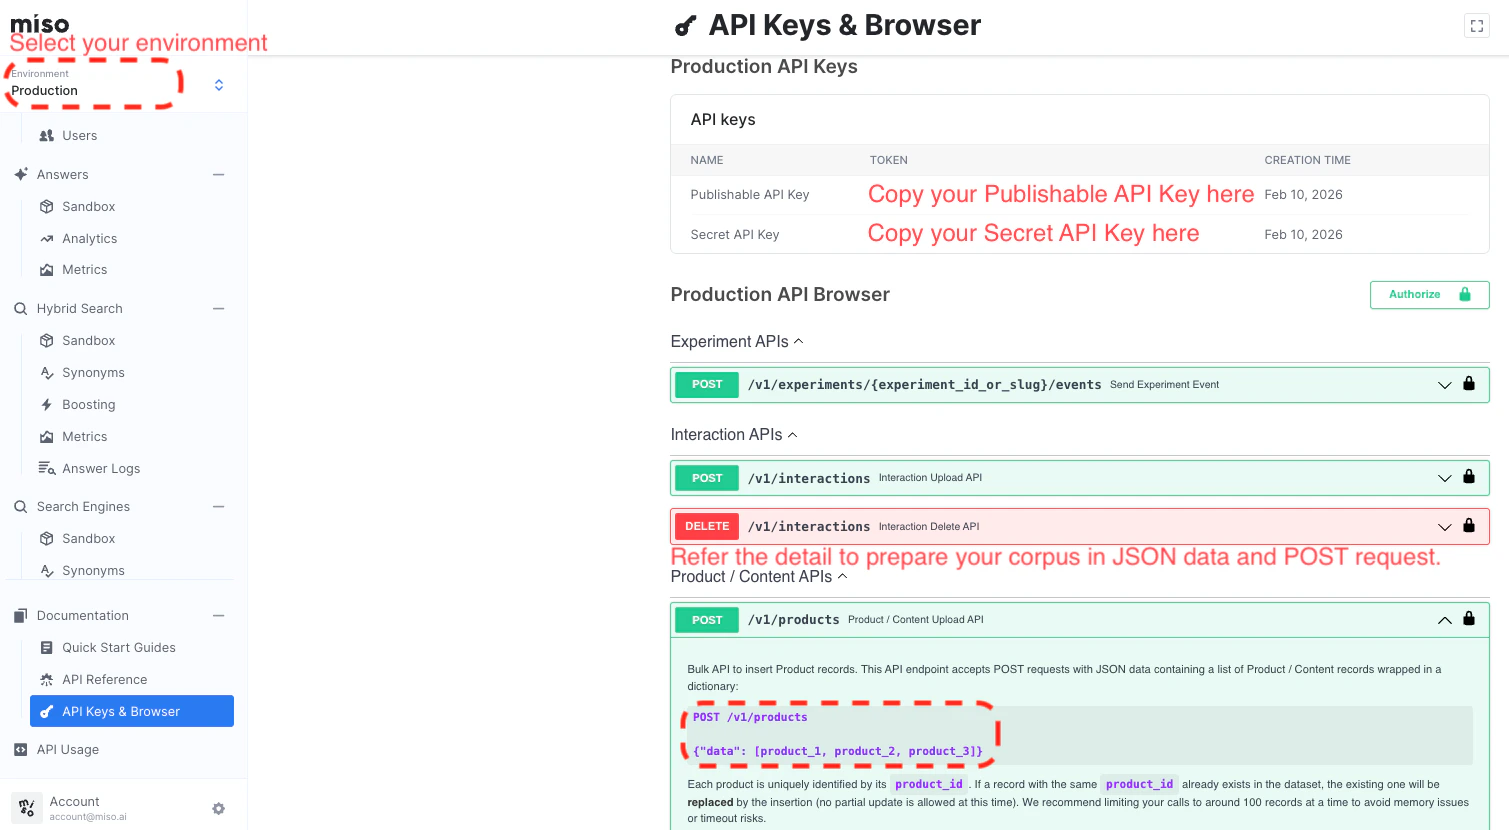
There is one publishable key and one secret key per environment. The publishable key is used in client-side code; the secret key is used for server-side API calls.
2

Upload Your Corpus via API

Upload your content to Miso using the Product / Content Upload API. You can do this with any HTTP client โ€” the steps below use Postman.Endpoint โ€” View full API reference
POST https://api.askmiso.com/v1/products
Step 1 โ€” Set your request headersIn Postman, go to the Headers tab and add your Secret API Key:
HeaderValue
X-API-KEYYour Secret API Key
Content-Typeapplication/json
Postman โ€” set the X-API-KEY header with your Secret API KeyStep 2 โ€” Add your request bodySwitch to the Body tab, select raw โ†’ JSON, and paste your corpus data:
{
  "data": [
    {
      "product_id": "art_001",
      "title": "Your Article Title Here",
      "url": "https://yoursite.com/your-article",
      "cover_image": "https://yoursite.com/cover.png",
      "description": "A brief description of the article content.",
      "html": "" // Full article HTML content, JSON-escaped
    },
    {
      "product_id": "art_002",
      "title": "Another Article Title",
      "url": "https://yoursite.com/another-article",
      "cover_image": "https://yoursite.com/cover2.png",
      "description": "Another article description.",
      "html": "" // Full article HTML content, JSON-escaped
    }
  ]
}
Step 3 โ€” Send and verifyClick Send. A 
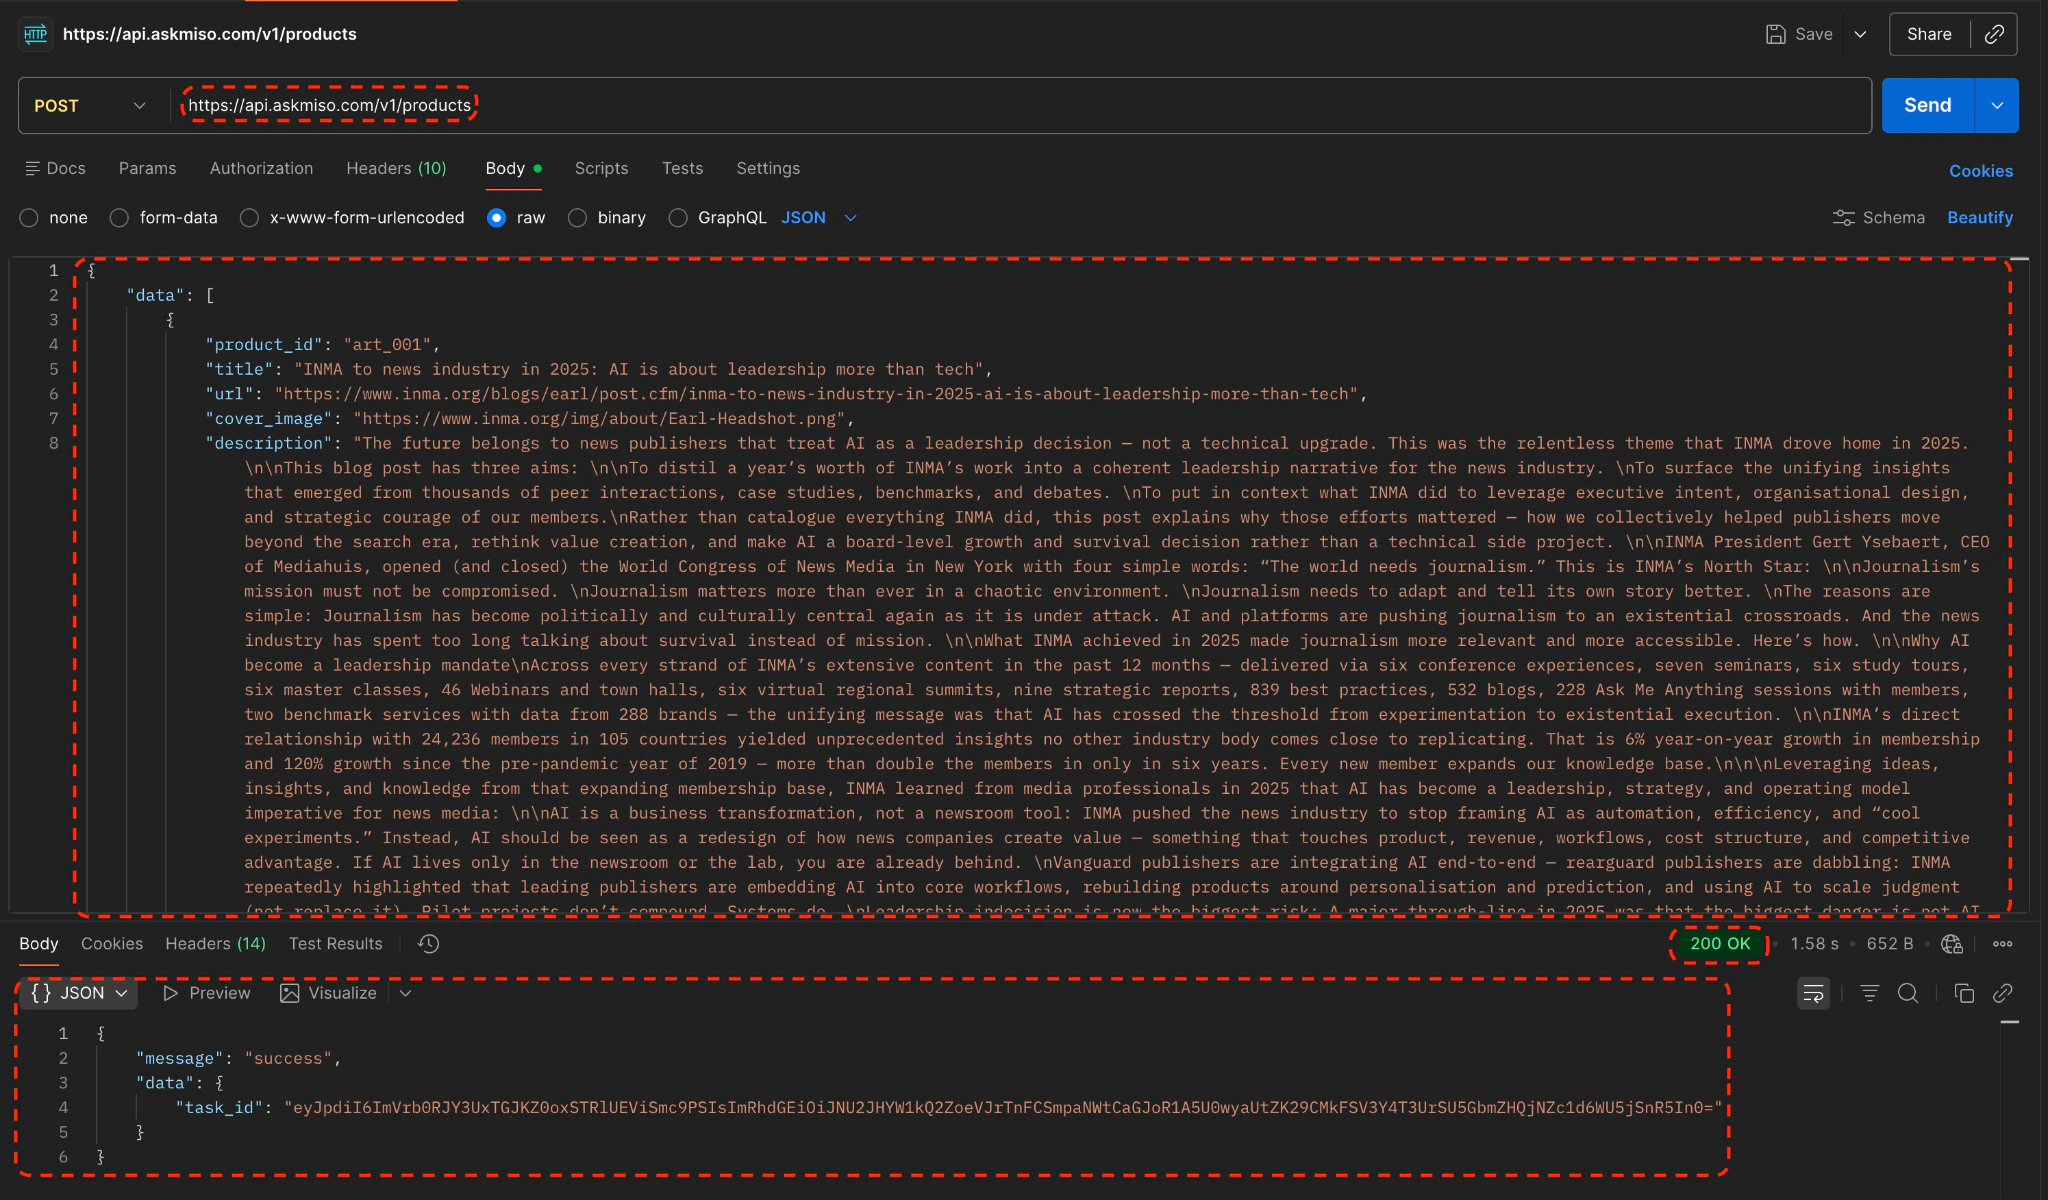
200 OK response confirms the corpus has been uploaded successfully.Postman โ€” request body with JSON data and 200 OK responseYou can verify the upload under Miso Dashboard โ†’ Data Sets โ†’ Catalog.Miso Dashboard โ€” Data Sets โ†’ Catalog showing uploaded articles
To generate related questions for the Explore module, contact Miso support to add your target environment to the related questions cronjob.
3

Install the Miso SDK

Add the Miso JavaScript SDK to your webpage using either method:
Install the SDK via npm:
npm install --save @miso.ai/client-sdk
Then import it in your JavaScript file:
import MisoClient from '@miso.ai/client-sdk';
4

Add the Explore UI to Your Page

Place the Explore elements in your HTML where you want related questions to appear:
<body>
  <miso-explore>
    <miso-related-questions></miso-related-questions>
    <!-- miso-query support is available since SDK v1.9.1 -->
    <miso-query></miso-query>
  </miso-explore>
</body>
Configure the workflow by adding the following script:
<script>
  const misocmd = window.misocmd || (window.misocmd = []);
  misocmd.push(() => {
    // work with MisoClient
    const MisoClient = window.MisoClient;

    // 1. create a Miso client instance and access the explore workflow
    const client = new MisoClient('YOUR_PUBLISHABLE_API_KEY');
    const workflow = client.ui.explore;

    // 2. tell the workflow which article you want to generate questions against
    //    the product_id must match the ones in your catalog
    workflow.useApi({
      product_id: 'art_001',
    });

    // 3. tell the workflow how to get to the answers page given a question
    //    the path must match the path of the answers page in your website
    workflow.useLink(question =>
      `client_sdk_test_ask.html?q=${encodeURIComponent(question)}`
    );

    // 4. kick off the workflow
    workflow.start();
  });
</script>
Replace YOUR_PUBLISHABLE_API_KEY with the key from Step 1, and set product_id to match an existing article in your catalog. The useLink function controls where users land when they click a related question.

Complete Example

Here is a minimal working HTML file:
<!DOCTYPE html>
<html lang="en">
<head>
  <meta charset="UTF-8" />
  <title>Miso Explore Demo</title>
  <script async src="https://cdn.jsdelivr.net/npm/@miso.ai/client-sdk@1.12.7/dist/umd/miso.min.js"></script>
</head>
<body>
  <miso-explore>
    <miso-related-questions></miso-related-questions>
    <miso-query></miso-query>
  </miso-explore>

  <script>
    const misocmd = window.misocmd || (window.misocmd = []);
    misocmd.push(() => {
      // work with MisoClient
      const MisoClient = window.MisoClient;

      // 1. create a Miso client instance and access the explore workflow
      const client = new MisoClient('YOUR_PUBLISHABLE_API_KEY');
      const workflow = client.ui.explore;

      // 2. tell the workflow which article you want to generate questions against
      //    the product_id must match the ones in your catalog
      workflow.useApi({
        product_id: 'art_001',
      });

      // 3. tell the workflow how to get to the answers page given a question
      //    the path must match the path of the answers page in your website
      workflow.useLink(question =>
        `client_sdk_test_ask.html?q=${encodeURIComponent(question)}`
      );

      // 4. kick off the workflow
      workflow.start();
    });
  </script>
</body>
</html>
Save as client_sdk_test_explore.html and open in a browser to see the Explore module displaying related questions for the specified article.

Live Demo & Visuals

Once configured, the Miso Explore module provides a clean, interactive UI out of the box. To verify your setup is working:
  1. Open client_sdk_test_explore.html in a browser.
  2. The module will display AI-generated related questions based on the article specified by product_id.
Explore module โ€” related questions panel
API keys can be passed via the api_key query parameter or the X-API-KEY request header. There is one publishable key and one secret key per environment โ€” use the publishable key in client-side code and the secret key for server-side API calls.

Next Steps

Template Helpers

Learn how to customize the Explore module UI.

Ask Module Quick Start

Set up the Ask module to answer user questions.

Product / Content Upload API

Full reference for uploading your corpus to Miso.

QA Questions API

The underlying API that powers related question generation for the Explore module.

Authentication

Learn how API keys work and how to authenticate your requests.