> ## Documentation Index
> Fetch the complete documentation index at: https://docs.miso.ai/llms.txt
> Use this file to discover all available pages before exploring further.
# Hybrid Search Quick Start
> Combine traditional keyword search with AI-generated answers in a single unified interface.
## Overview
**Hybrid Search** delivers the best of both worlds: traditional keyword search results alongside AI-generated answers from your content. Users get direct, intelligent responses paired with a list of relevant articles — all in one seamless interface.
Log in to the [Miso Dashboard](https://dojo.askmiso.com), select your target environment (e.g., **Production**), and navigate to the **Overview** section to copy your **Publishable API Key**.
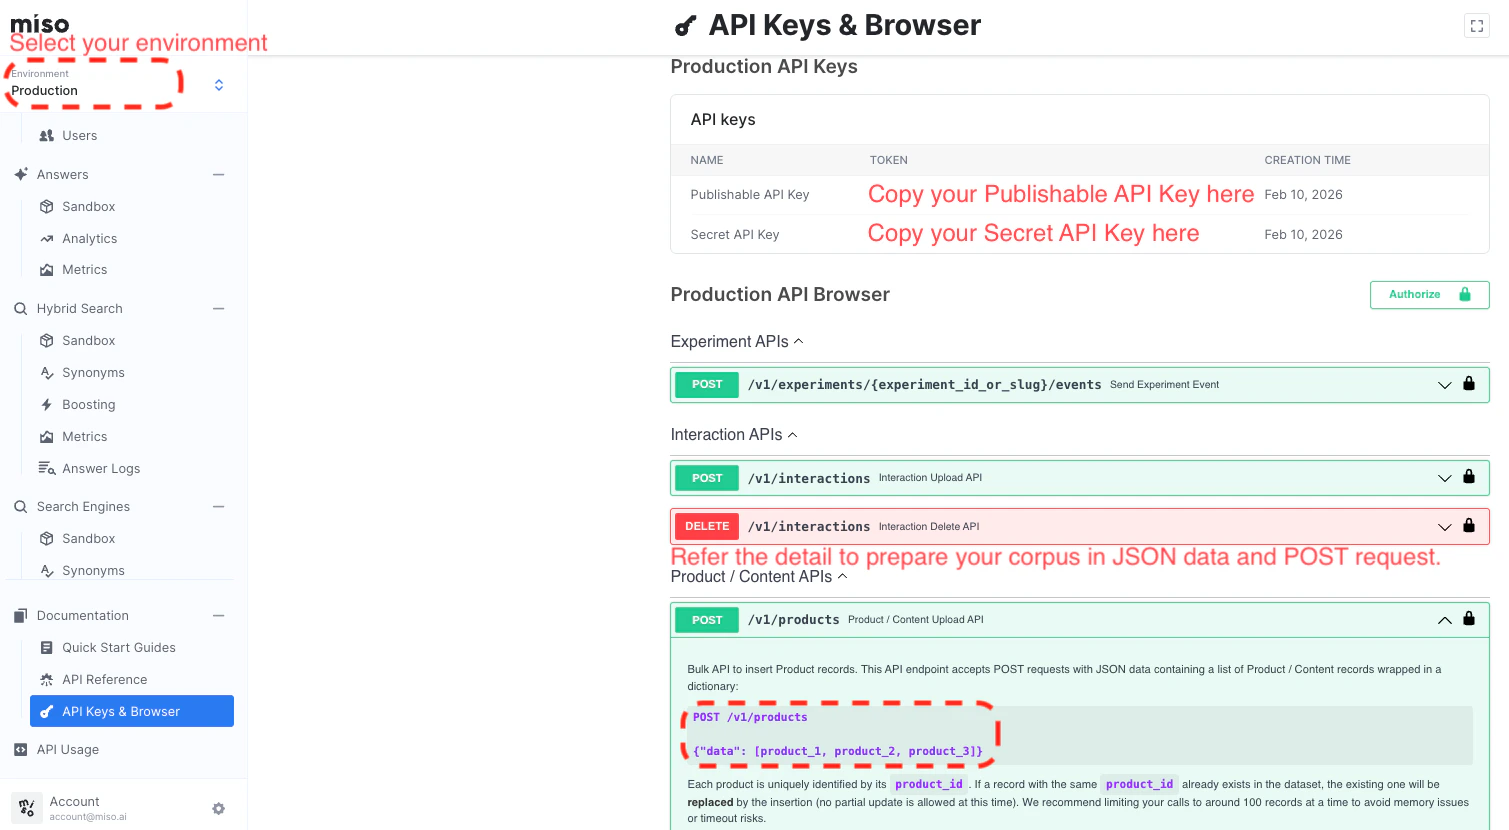 There is one publishable key and one secret key per environment. The publishable key is used in client-side code; the secret key is used for server-side API calls.
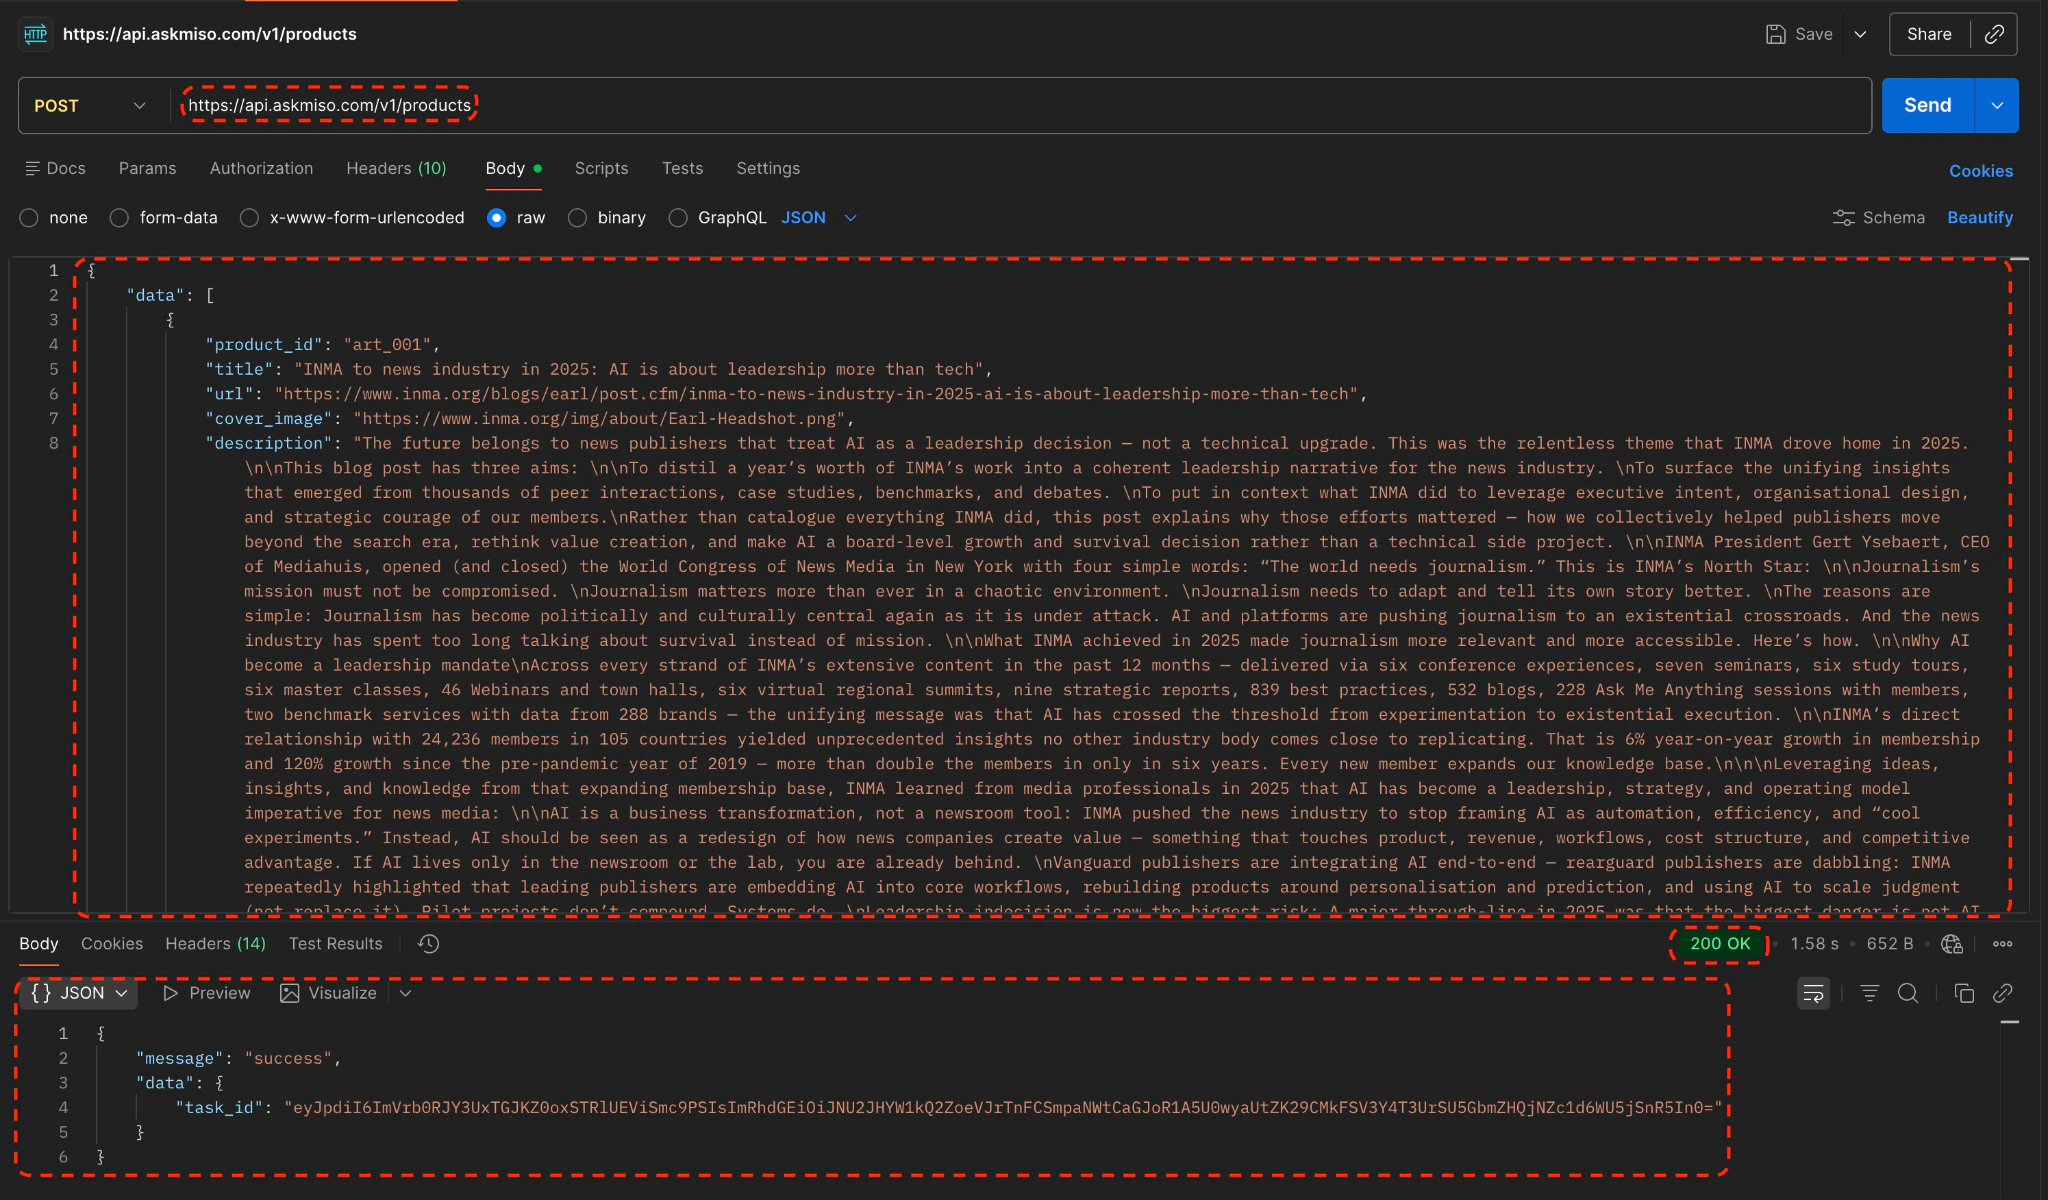
Upload your content to Miso using the [**Product / Content Upload API**](/api-reference/product-content-apis/product-content-upload-api). You can do this with any HTTP client — the steps below use [Postman](https://www.postman.com/).
**Endpoint** — [View full API reference](/api-reference/product-content-apis/product-content-upload-api)
```
POST https://api.askmiso.com/v1/products
```
**Step 1 — Set your request headers**
In Postman, go to the **Headers** tab and add your Secret API Key:
| Header | Value |
| -------------- | ------------------- |
| `X-API-KEY` | Your Secret API Key |
| `Content-Type` | `application/json` |
There is one publishable key and one secret key per environment. The publishable key is used in client-side code; the secret key is used for server-side API calls.
Upload your content to Miso using the [**Product / Content Upload API**](/api-reference/product-content-apis/product-content-upload-api). You can do this with any HTTP client — the steps below use [Postman](https://www.postman.com/).
**Endpoint** — [View full API reference](/api-reference/product-content-apis/product-content-upload-api)
```
POST https://api.askmiso.com/v1/products
```
**Step 1 — Set your request headers**
In Postman, go to the **Headers** tab and add your Secret API Key:
| Header | Value |
| -------------- | ------------------- |
| `X-API-KEY` | Your Secret API Key |
| `Content-Type` | `application/json` |
 **Step 2 — Add your request body**
Switch to the **Body** tab, select **raw → JSON**, and paste your corpus data:
```json theme={null}
{
"data": [
{
"product_id": "art_001",
"title": "Your Article Title Here",
"url": "https://yoursite.com/your-article",
"cover_image": "https://yoursite.com/cover.png",
"description": "A brief description of the article content.",
"html": "" // Full article HTML content, JSON-escaped
},
{
"product_id": "art_002",
"title": "Another Article Title",
"url": "https://yoursite.com/another-article",
"cover_image": "https://yoursite.com/cover2.png",
"description": "Another article description.",
"html": "" // Full article HTML content, JSON-escaped
}
]
}
```
**Step 3 — Send and verify**
Click **Send**. A `200 OK` response confirms the corpus has been uploaded successfully.
**Step 2 — Add your request body**
Switch to the **Body** tab, select **raw → JSON**, and paste your corpus data:
```json theme={null}
{
"data": [
{
"product_id": "art_001",
"title": "Your Article Title Here",
"url": "https://yoursite.com/your-article",
"cover_image": "https://yoursite.com/cover.png",
"description": "A brief description of the article content.",
"html": "" // Full article HTML content, JSON-escaped
},
{
"product_id": "art_002",
"title": "Another Article Title",
"url": "https://yoursite.com/another-article",
"cover_image": "https://yoursite.com/cover2.png",
"description": "Another article description.",
"html": "" // Full article HTML content, JSON-escaped
}
]
}
```
**Step 3 — Send and verify**
Click **Send**. A `200 OK` response confirms the corpus has been uploaded successfully.
 You can verify the upload under **Miso Dashboard → Data Sets → Catalog**.
 Add the Miso JavaScript SDK to your webpage using either method:
Install the SDK via npm:
```bash theme={null}
npm install --save @miso.ai/client-sdk
```
Then import it in your JavaScript file:
```js theme={null}
import MisoClient from '@miso.ai/client-sdk';
```
Add the following to your ``:
```html theme={null}
```
Since the SDK loads asynchronously, use the `misocmd` queue to ensure your code runs only after the SDK is ready:
```js theme={null}
const misocmd = window.misocmd || (window.misocmd = []);
misocmd.push(() => {
const MisoClient = window.MisoClient;
// Your initialization code here
});
```
**Place the container element** in your HTML where you want the search interface to appear:
```html theme={null}
```
**Configure the workflow** by adding the following script:
```html theme={null}
```
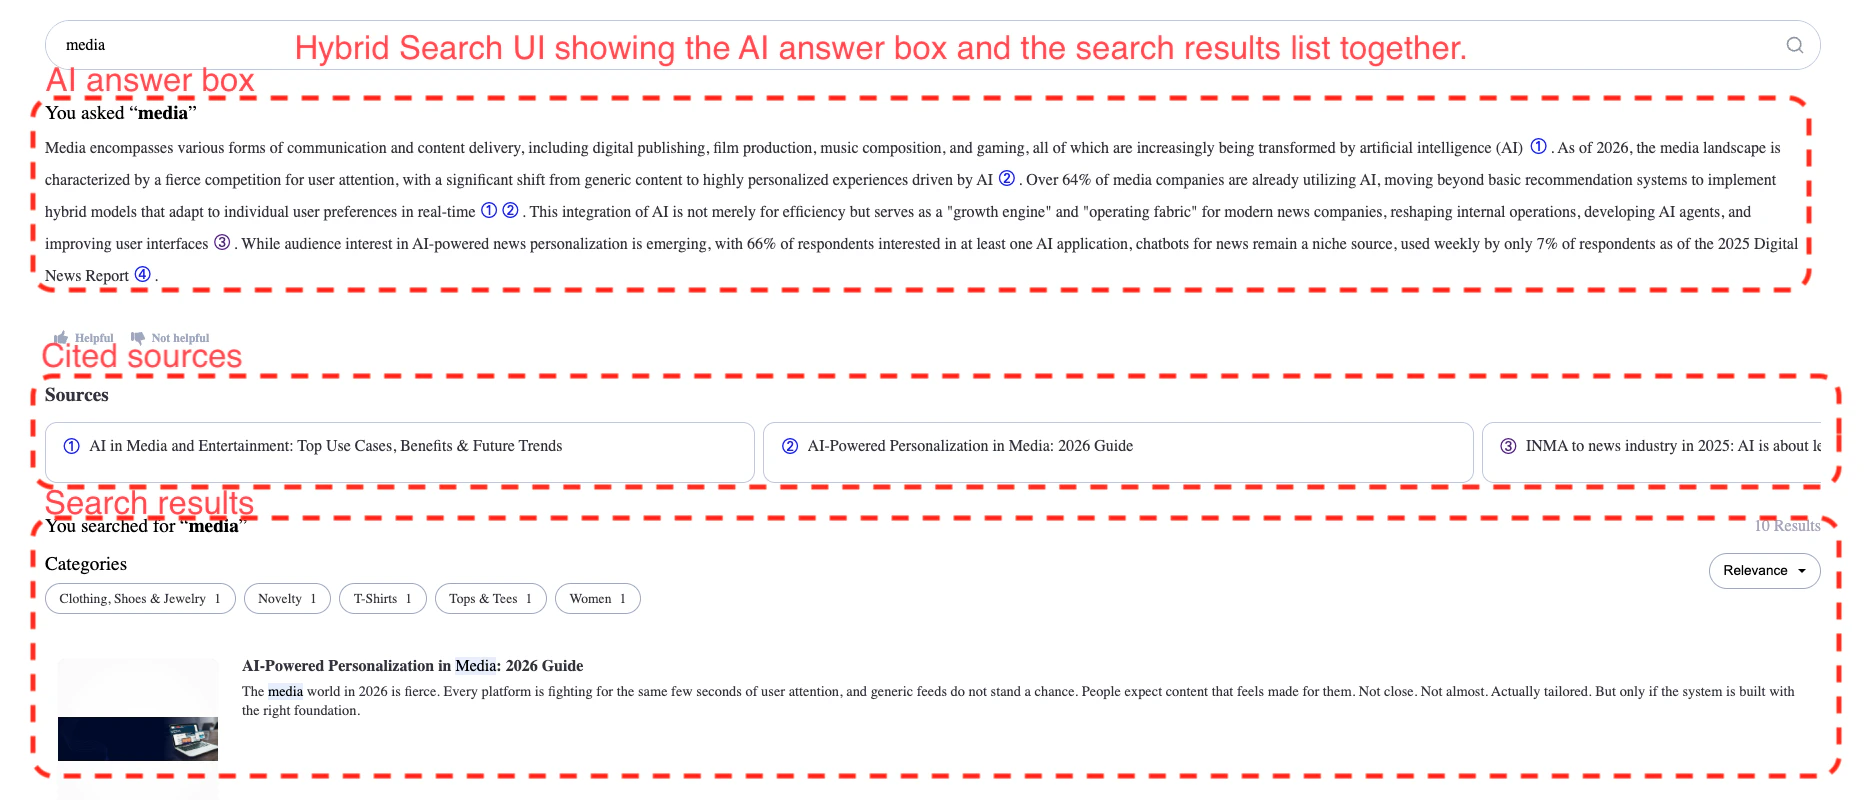
Replace `YOUR_PUBLISHABLE_API_KEY` with the key from Step 1. To test, open the page in a browser and append `?q=media` to the URL to see both AI answers and keyword search results side by side.
## Complete Example
Here is a minimal working HTML file:
```html theme={null}
Miso Hybrid Search Demo
```
Save as `client_sdk_test_hybrid_search.html`, open in a browser, and append `?q=media` to the URL to see the Hybrid Search module in action.
## Live Demo & Visuals
Once configured, the Miso Hybrid Search module provides a unified, interactive UI out of the box.
To verify your setup is working:
1. Open `client_sdk_test_hybrid_search.html` in a browser.
2. Append `?q=media` to the URL — you should see an AI-generated answer alongside keyword search results, cited sources, and category filters.
Add the Miso JavaScript SDK to your webpage using either method:
Install the SDK via npm:
```bash theme={null}
npm install --save @miso.ai/client-sdk
```
Then import it in your JavaScript file:
```js theme={null}
import MisoClient from '@miso.ai/client-sdk';
```
Add the following to your ``:
```html theme={null}
```
Since the SDK loads asynchronously, use the `misocmd` queue to ensure your code runs only after the SDK is ready:
```js theme={null}
const misocmd = window.misocmd || (window.misocmd = []);
misocmd.push(() => {
const MisoClient = window.MisoClient;
// Your initialization code here
});
```
**Place the container element** in your HTML where you want the search interface to appear:
```html theme={null}
```
**Configure the workflow** by adding the following script:
```html theme={null}
```
Replace `YOUR_PUBLISHABLE_API_KEY` with the key from Step 1. To test, open the page in a browser and append `?q=media` to the URL to see both AI answers and keyword search results side by side.
## Complete Example
Here is a minimal working HTML file:
```html theme={null}
Miso Hybrid Search Demo
```
Save as `client_sdk_test_hybrid_search.html`, open in a browser, and append `?q=media` to the URL to see the Hybrid Search module in action.
## Live Demo & Visuals
Once configured, the Miso Hybrid Search module provides a unified, interactive UI out of the box.
To verify your setup is working:
1. Open `client_sdk_test_hybrid_search.html` in a browser.
2. Append `?q=media` to the URL — you should see an AI-generated answer alongside keyword search results, cited sources, and category filters.
 API keys can be passed via the `api_key` query parameter or the `X-API-KEY` request header. There is one publishable key and one secret key per environment — use the **publishable key** in client-side code and the **secret key** for server-side API calls.
## Next Steps
Set up the Ask module for standalone Q\&A.
Add related questions to your article pages.
Full reference for uploading your corpus to Miso.
The underlying search API powering keyword results in Hybrid Search.
The underlying API powering AI-generated answers in Hybrid Search.
Learn how API keys work and how to authenticate your requests.
API keys can be passed via the `api_key` query parameter or the `X-API-KEY` request header. There is one publishable key and one secret key per environment — use the **publishable key** in client-side code and the **secret key** for server-side API calls.
## Next Steps
Set up the Ask module for standalone Q\&A.
Add related questions to your article pages.
Full reference for uploading your corpus to Miso.
The underlying search API powering keyword results in Hybrid Search.
The underlying API powering AI-generated answers in Hybrid Search.
Learn how API keys work and how to authenticate your requests.